

ICTFax Admin Guide
This guide is for the person who runs an ICTFax Community Edition server. It covers the Administration menu: connecting a SIP trunk, adding fax numbers (DIDs) and giving them to users, creating user accounts and extensions, setting up email to fax on the server, and the first security steps after a fresh install.
Haven’t installed ICTFax yet? Follow the ICTFax installation guide first. For everyday tasks such as sending faxes, contacts and forwarding, see the ICTFax user guide.
What’s in the Administration menu
Log in with the admin account and click Administration at the bottom of the left menu. It opens four items:
- DID Number: the inbound fax numbers on the system, and who owns each one.
- Providers / Trunks: the SIP trunks ICTFax uses to send and receive faxes.
- User Management: the people who log in to the web interface.
- Extensions: SIP logins for fax machines, ATAs and softphones.
A sensible order for a new server is: add a provider, add your DIDs, create users, assign the DIDs, and create extensions only if you’re connecting fax machines.
Providers / Trunks
A provider is the SIP trunk that carries your fax calls to and from the phone network. Open Providers / Trunks to see the Provider list with each trunk’s name, host and type.
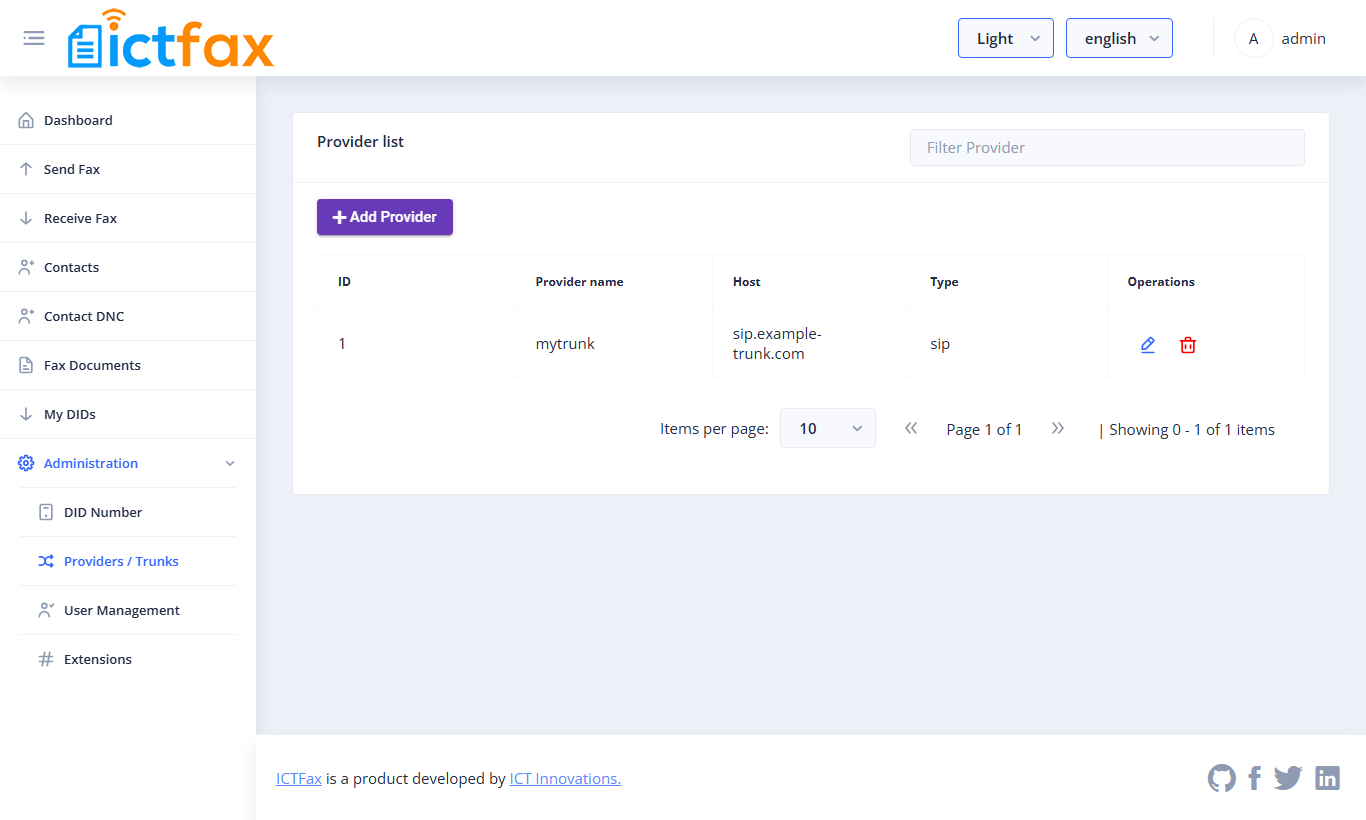
Click Add Provider and fill in the form. Your trunk provider gives you most of these values.
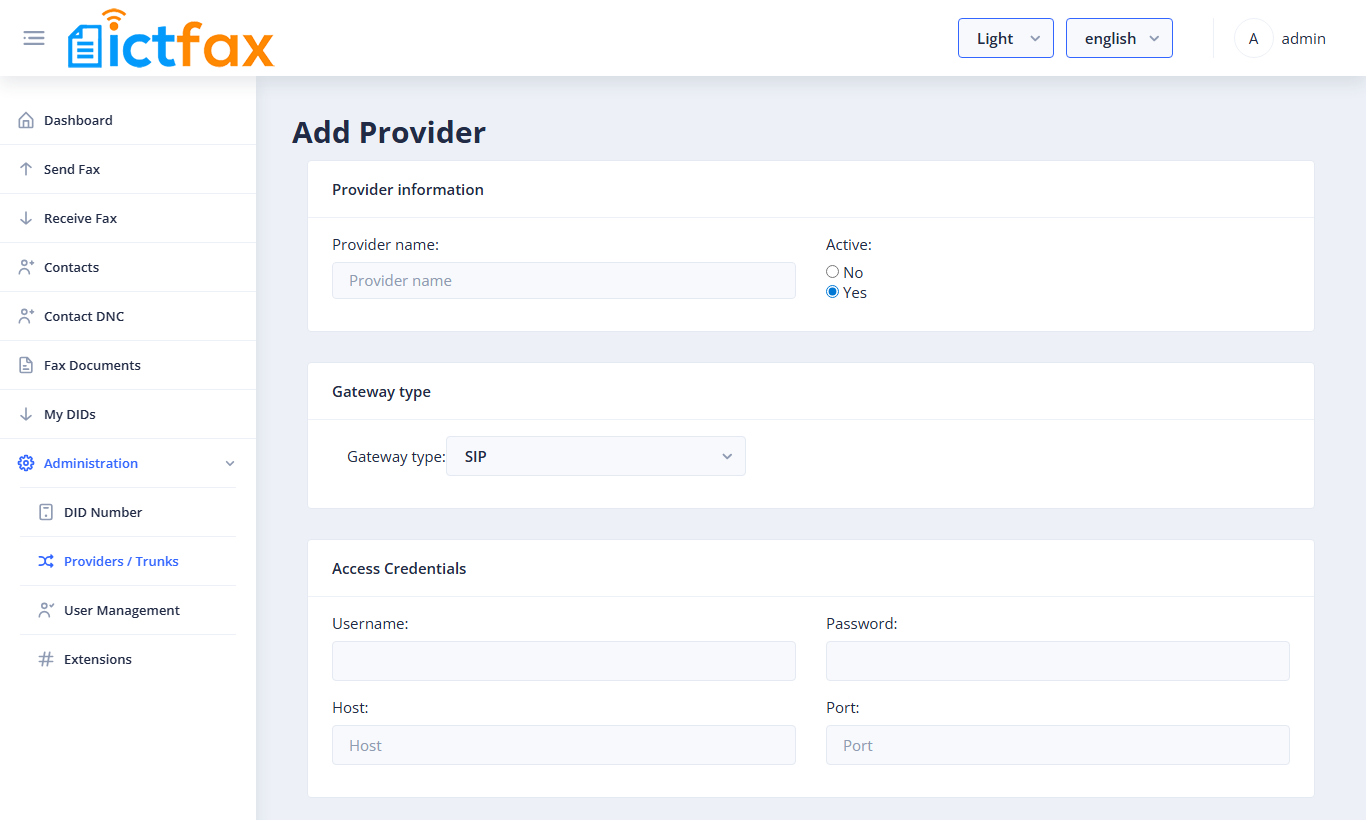
| Field | What to enter |
|---|---|
| Provider name | Any name you’ll recognise, for example “mytrunk”. |
| Active | Yes to use the trunk, No to switch it off without deleting it. |
| Gateway type | SIP. |
| Username, Password | The SIP credentials from your provider. |
| Host | The provider’s SIP server address, for example sip.example-trunk.com. |
| Port | Usually 5060. |
| Register | On if your provider expects ICTFax to register to the trunk with the username and password. Off if the provider doesn’t need registration. |
| Prefix | Rules that rewrite the dialled number before it goes to this trunk. See below. |
| Settings | Leave it empty. The SIP gateway doesn’t use it. |
Click Submit. The trunk joins the list, and you can edit or delete it from the Operations column.
Prefix rules
Different trunks want numbers in different formats. The Prefix field lets you fix that without asking users to change how they dial. ICTFax applies these rules when it dials out.
Each rule is written as remove|add: the digits to strip from the start of the number, a pipe, then the digits to put in their place. Separate several rules with commas. ICTFax checks them in order, and the first rule that changes the number wins.
| Rule | What it does | Example |
|---|---|---|
00| |
Strips a leading 00. | 0015550199001 becomes 15550199001 |
0|92 |
Turns a leading 0 into 92. | 05550199001 becomes 925550199001 |
|1 |
Adds 1 in front of every number. | 5550199001 becomes 15550199001 |
| (empty) | Sends numbers unchanged. | 15550199001 stays 15550199001 |
You can combine them, for example 00|,0|92. A number starting with 00 loses the 00. A number starting with a single 0 gets 92 instead. Order matters: put the longer, more specific rule first.
DID Number
DIDs are the phone numbers people fax you on. Your trunk provider sells them and sends their calls to your server. Open DID Number to see the DID List.
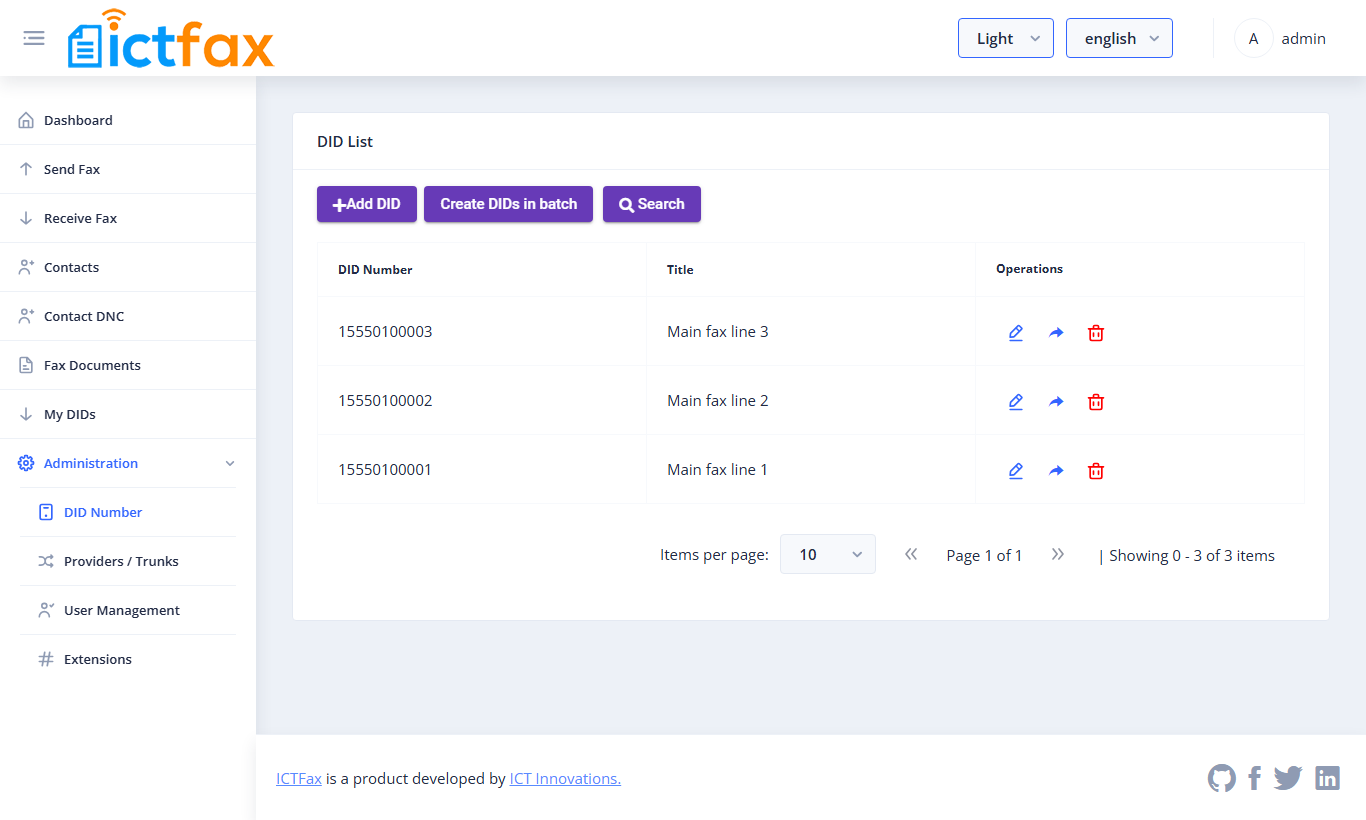
Add one DID
Click Add DID, enter the DID Number and a Title (for example “Main fax line 1”), and click Submit.
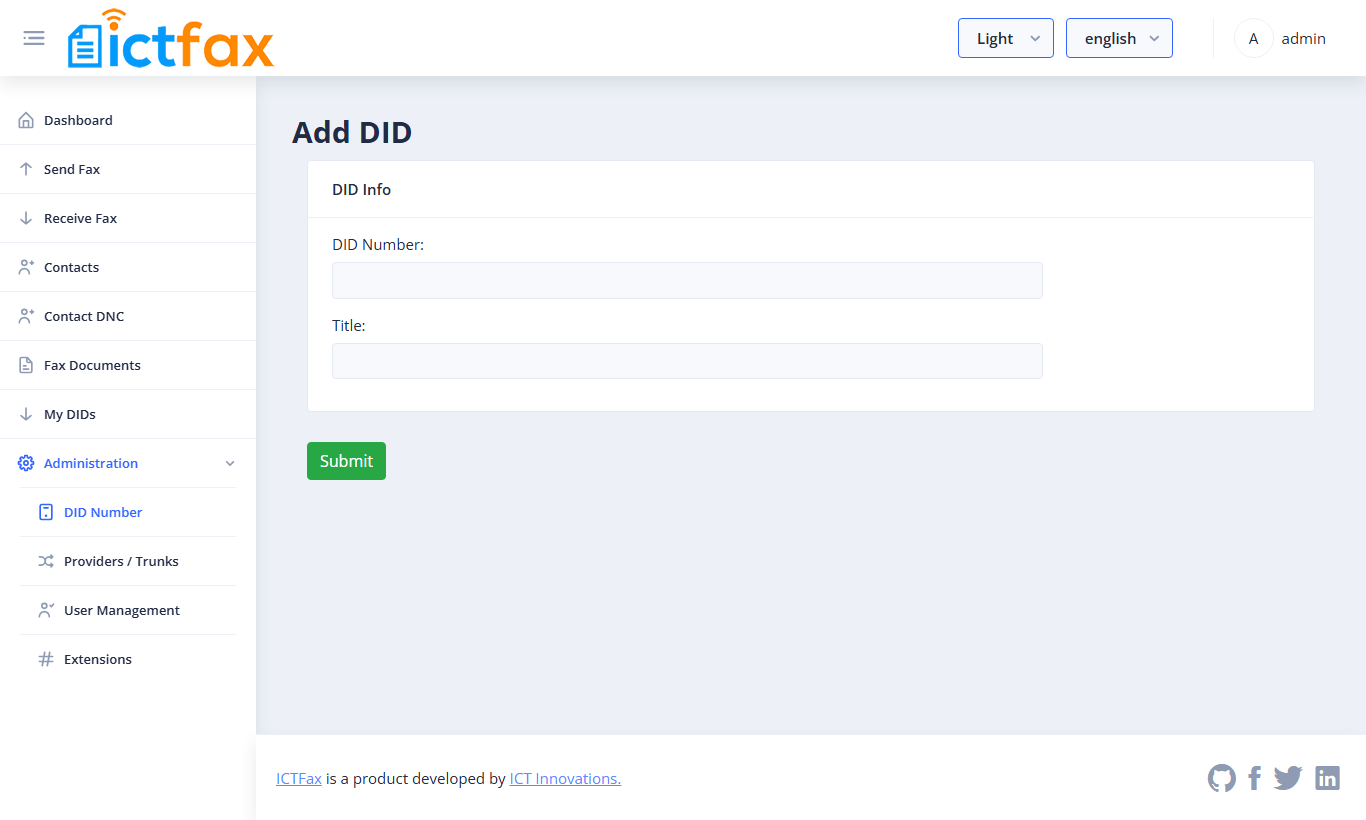
Add a range in one go
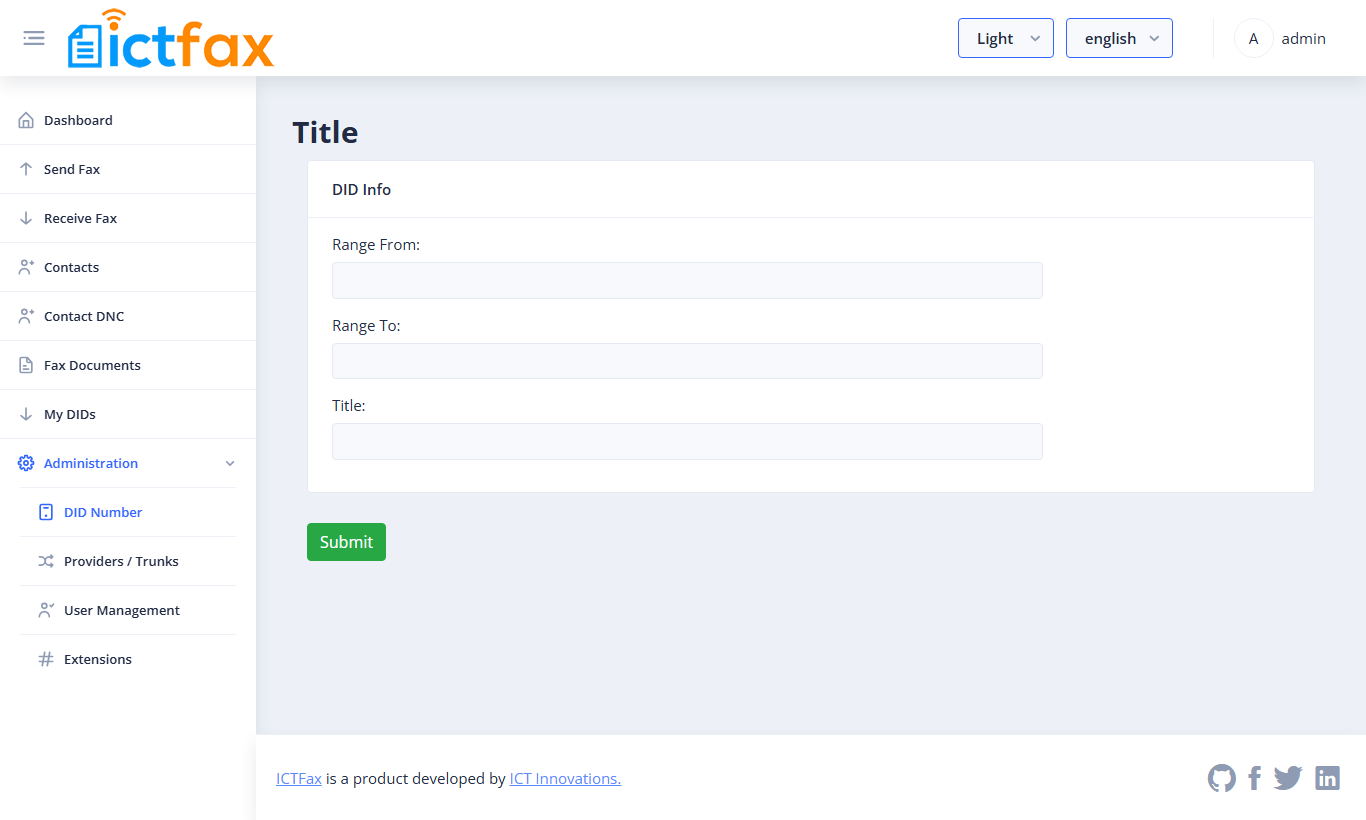
Bought a block of numbers? Click Create DIDs in batch. Enter the first number in Range From, the last in Range To, and a Title, then click Submit. ICTFax adds every number in between.
Assign a DID to a user
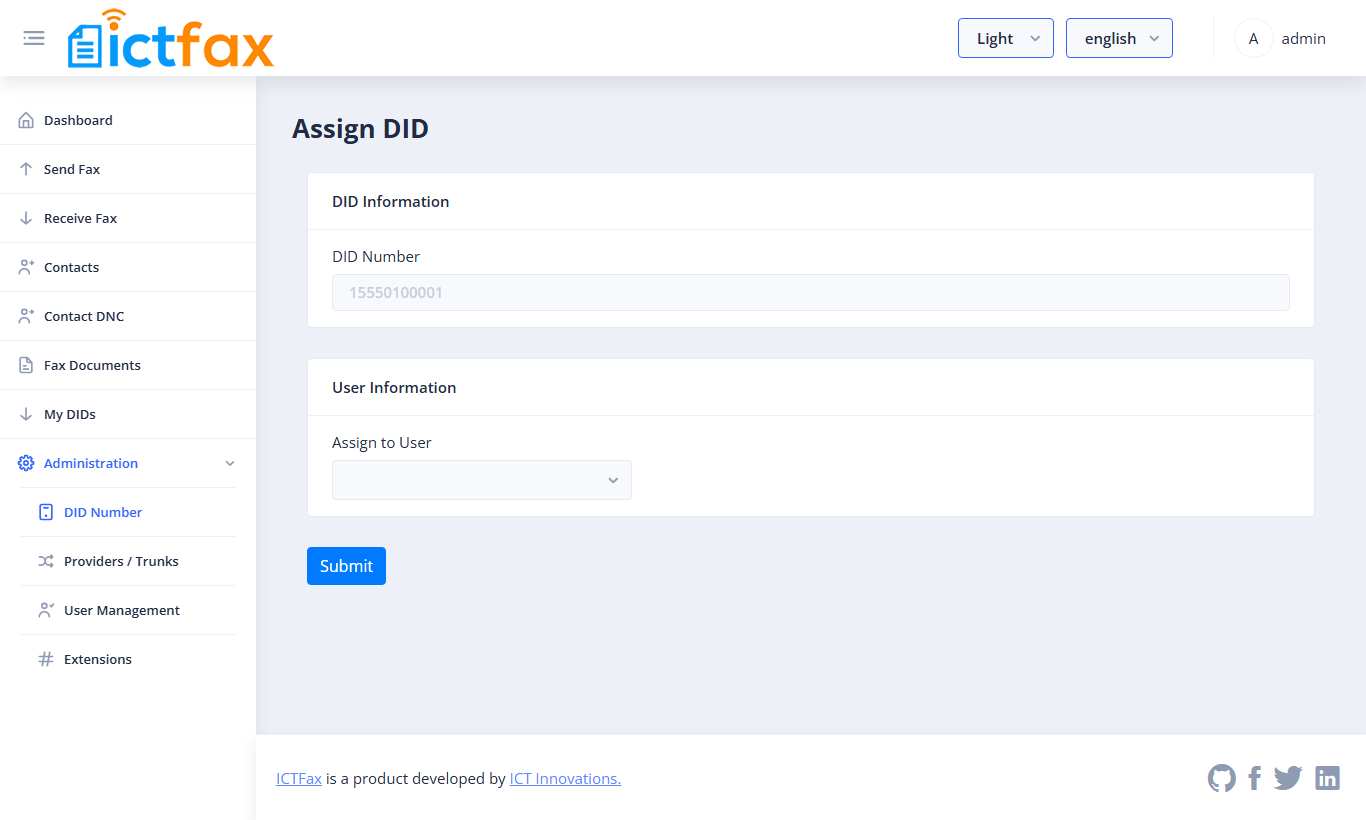
A DID does nothing until it belongs to someone. In the DID List, click the arrow icon beside the number. The Assign DID page shows the number under DID Information. Pick the person in Assign to User and click Submit.
The inbound path, start to finish
Here’s how a fax to one of your numbers reaches the right person:
- Your trunk provider routes the DID to your ICTFax server.
- You add the DID under DID Number.
- You assign it to a user.
- That user opens My DIDs, clicks the forward icon, and picks a service: Fax to Email (with extra recipients one per line), Forward to Extension, or No service.
Skip step 4 and the fax has nowhere to go. The user guide explains each forward option. Remember that faxes forwarded to an extension go straight to the device and aren’t stored under Receive Fax.
User Management
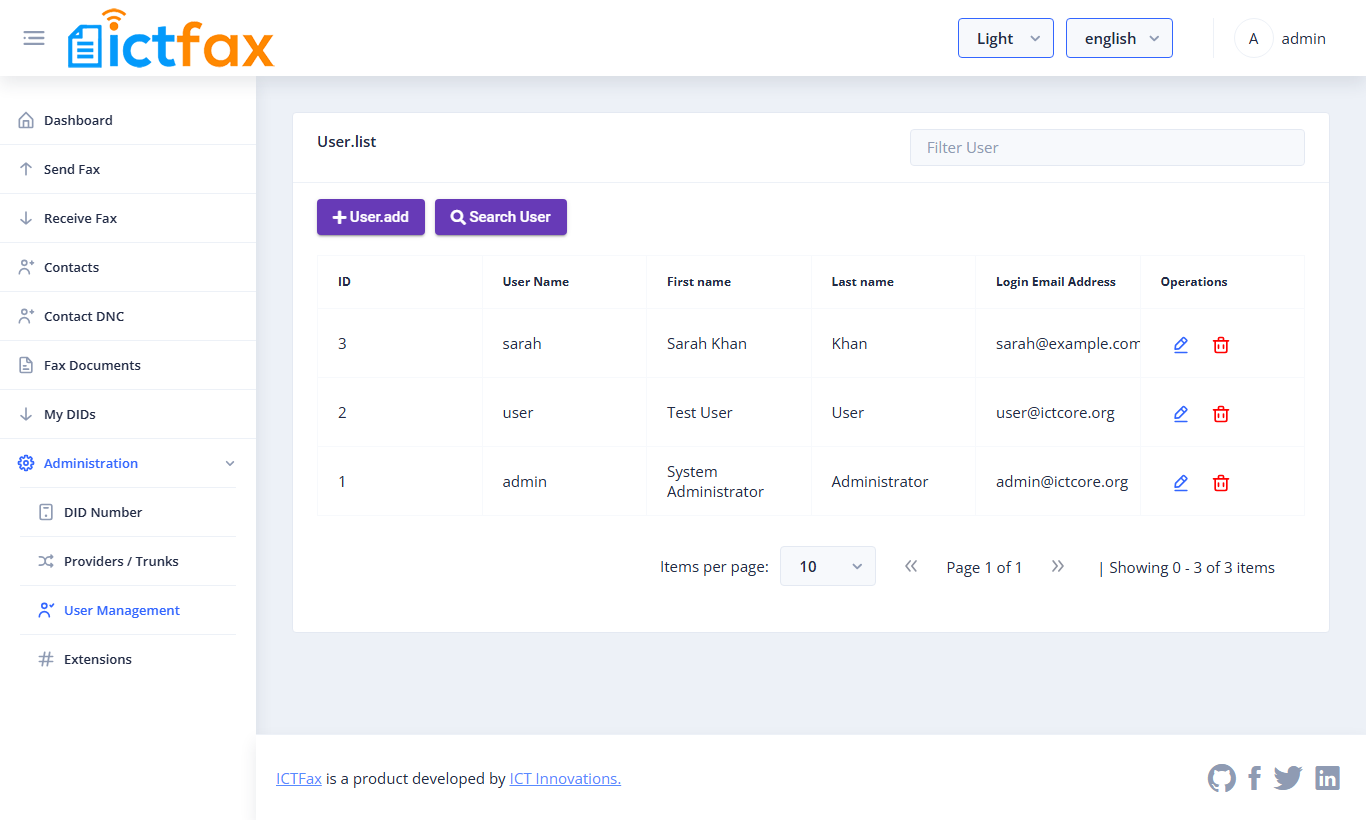
Open User Management to see everyone who can log in, with their user name, first and last name, and login email address.
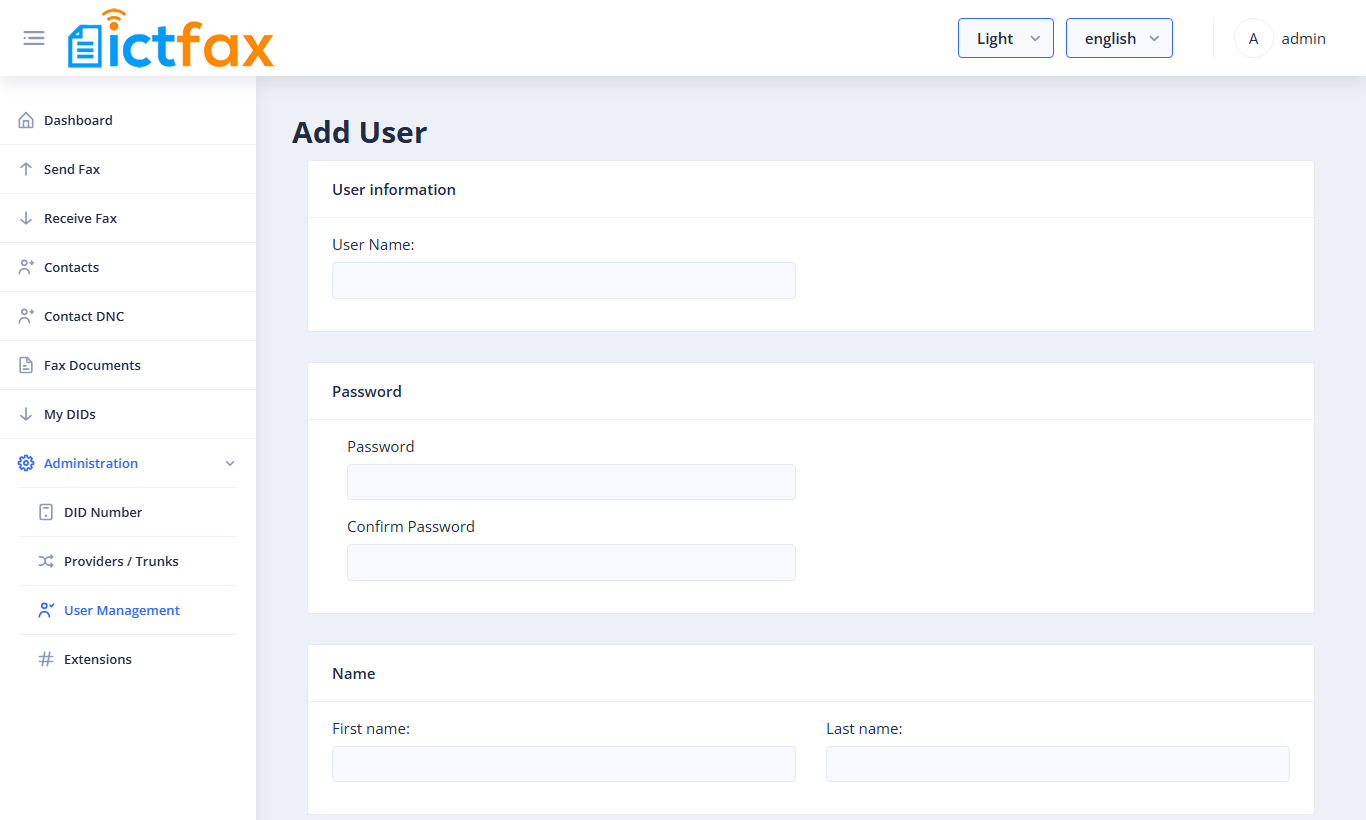
Click the add button to create a user. The form has three parts:
- User information: username, plus email, phone, company, address, country and timezone.
- Password: password and confirm password.
- Name: first name and last name.
Tick Active so the account can be used, then click Submit.
Get the email right. The user logs in with it, and email to fax uses it to work out who sent a message. Mail from an address that doesn’t match a user is refused.
Extensions
An extension is a SIP login for a fax machine on an ATA, or for a softphone. You only need one if you’re connecting a device. Open Extensions to see the Extension list.
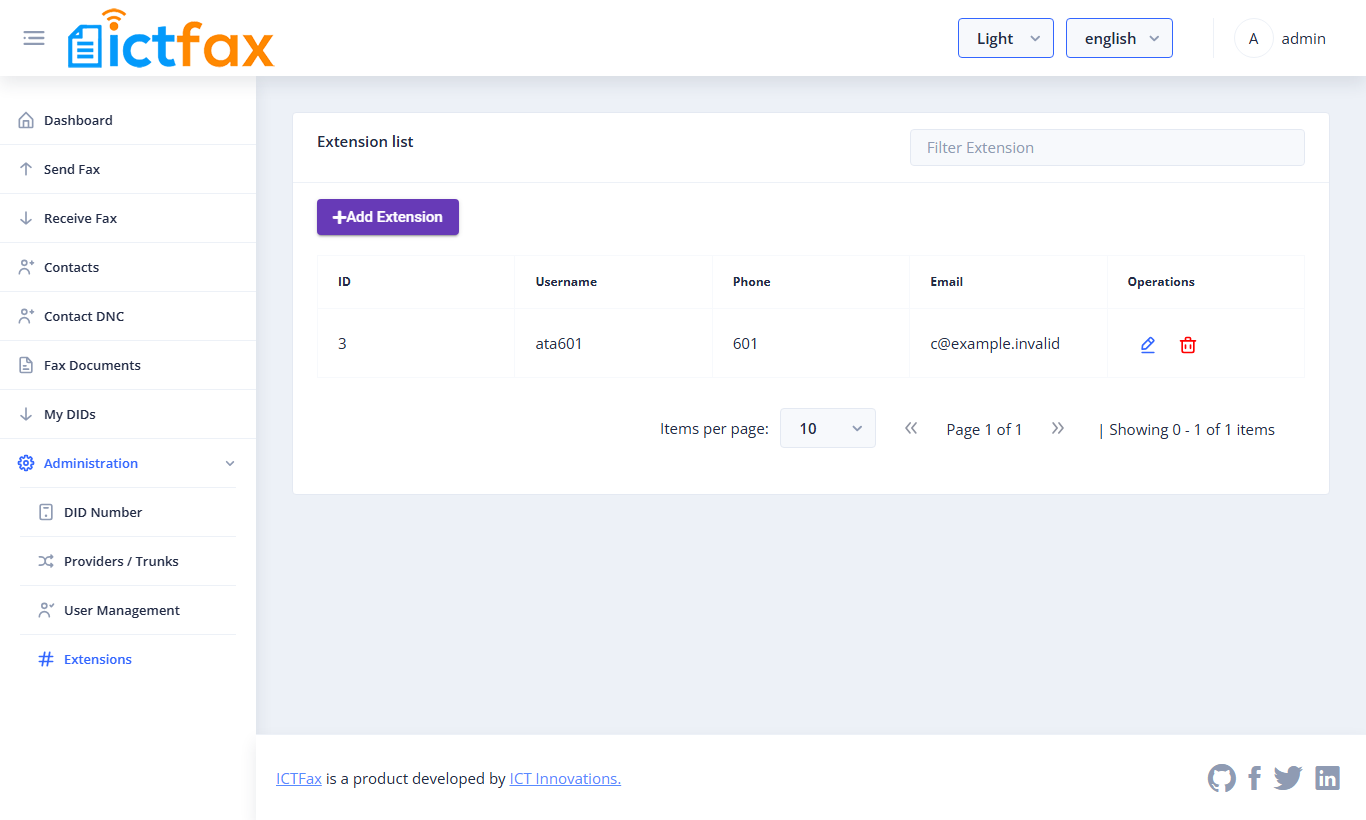
Click Add Extension and fill in the form:
| Field | What it’s for |
|---|---|
| Username | The SIP login the device uses. Enter it as the User ID and Auth ID on the ATA. |
| Password | The SIP password for the device. |
| Password Pin | A voicemail PIN. ICTFax doesn’t use it for faxing, so you can leave it empty. |
| First name, Last name, Email | Who or what the extension belongs to. |
| Phone | The number the extension shows as caller ID when it dials out. It’s also an alias you can dial the extension by. |
| Active | Must be on, or the device can’t register. |
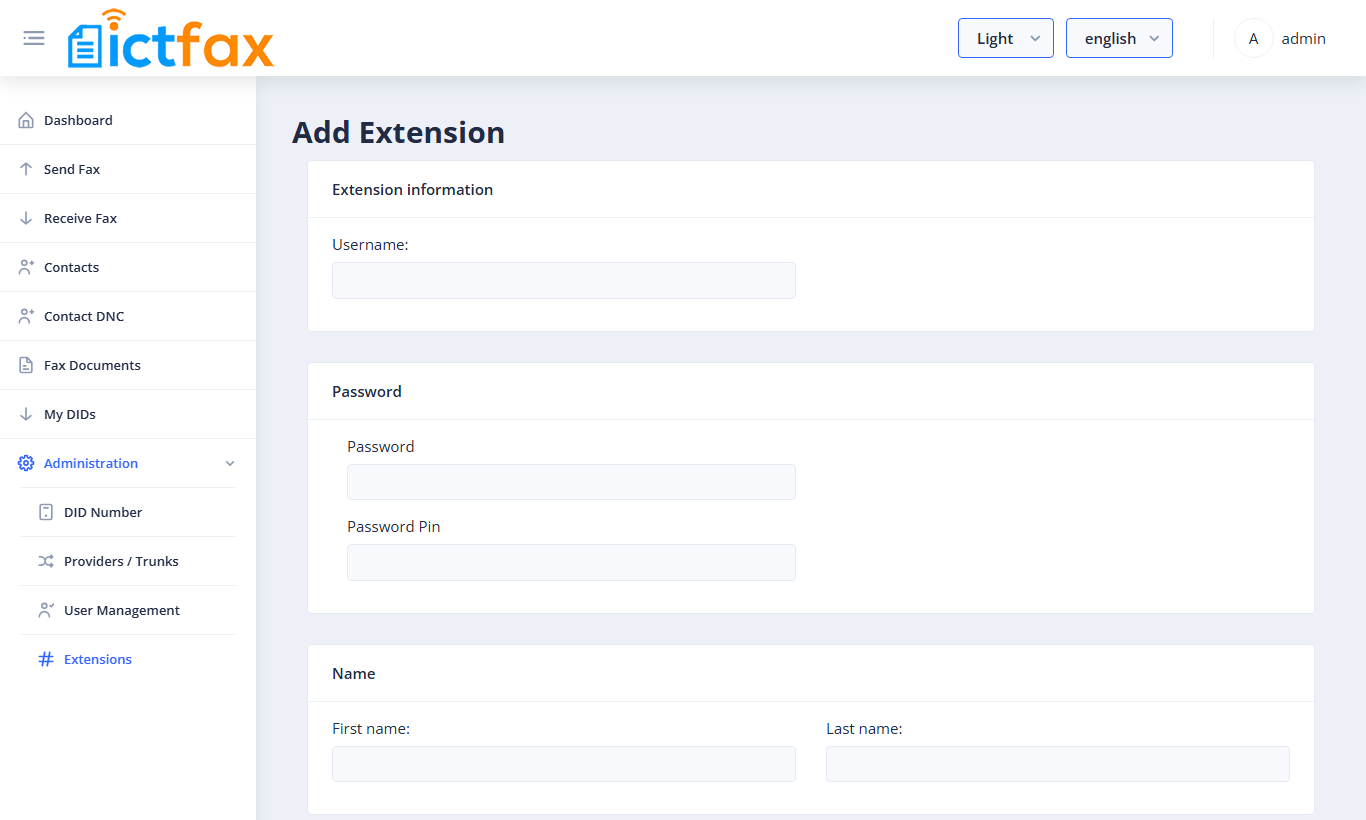
The extension belongs to the user who created it. To send a DID’s faxes to the device, that user picks the extension under My DIDs with Forward to Extension. The ATA settings, fax tuning and troubleshooting are all in the fax machine and ATA guide.
Email to fax: server settings
Users can send a fax by emailing <fax number>@<your fax domain>, for example 15550199001@fax.example.com. For that to work, the server has to receive mail for the fax domain:
- In
/usr/ictcore/etc/ictcore.conf, setdomainunder the[sendmail]section to your fax domain. The default islocalhost.[sendmail] domain = fax.example.com - Point an MX record for that domain at the ICTFax server.
- Open TCP port 25 in your firewall.
Sendmail delivers the messages into the local ictcore mailbox, and ICTCore’s email gateway picks them up from there. Attachments can be PDF, TIFF, PNG or JPEG, and Office files are converted with LibreOffice. The sender gets an email when the fax is accepted, sent or failed.
Fax to email works the other way round: each user turns it on per number under My DIDs, and incoming faxes are emailed as attachments. We recommend one more step here: the server sends these emails itself, so give the fax domain an SPF record that allows the server’s IP address (or relay through your own mail server). Otherwise the emails may land in spam.
Security basics
- Change the default admin password straight away. Every fresh install ships with the same demo admin login, printed in the installation guide. Log in, click your name at the top right, and choose Change Password.
- Remove FreeSWITCH’s demo SIP users. A stock FreeSWITCH install includes demo users 1000 to 1019 with the password 1234. The ATA guide gives the commands that remove them. Do it on every install, whether or not you use extensions.
- Open only the ports you use: 5060 UDP and TCP for SIP, the RTP media range (16384-32768 UDP on a normal install), 25 TCP if you use email to fax, and 80/443 for the web interface.
- Use strong extension passwords. An extension’s username and password are a SIP login that can dial out through your trunk.
Building your own integration? The fax API tutorial covers sending and receiving through the REST API.
The Community Edition serves one organisation. Multi-tenant hosting, bulk fax, cover pages and reports are available in the ICTFax Service Provider Edition.
FAQ
Do I need Register turned on for my trunk?
Only if your provider asks for it. Register makes ICTFax log in to the trunk with the username and password. If your provider doesn’t expect that, leave it off.
My outbound faxes fail straight away. Where do I look first?
Check that at least one provider is Active, and that its Prefix rules turn your numbers into the format the trunk expects. An empty Prefix sends numbers exactly as they were entered.
I assigned a DID but faxes to it go nowhere. Why?
The user still has to choose a service. Ask them to open My DIDs, click the forward icon, and pick Fax to Email or Forward to Extension.
What is the Password Pin on an extension?
It’s a voicemail PIN. ICTFax doesn’t use it for faxing, so you can leave it empty.
Why are emailed faxes rejected?
The From address must match the email of an ICTFax user. Also check that [sendmail] domain matches your fax domain, the MX record points at the server, and port 25 is open.
Where can I get help?
For professional help with the Community Edition, open a support ticket.